 |
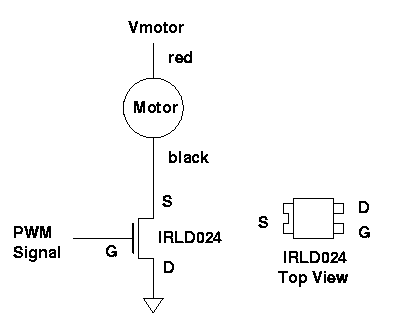
| Figure 1: Using a pulse-width-modulated signal to adjust the speed of a motor. |
Final version for 2001
Using the 68HC12 Pulse Width Modulation Subsystem
The speed of a motor can be adjusted by powering it with a pulse width modulated signal. Figure 1 shows how this can be done. The field effect transistor (FET), IRLD024, acts as a switch. When the signal on the gate of the FET is high the switch is closed, current flows through the motor, and the motor speeds up. When the signal is low, the switch is open, no current flows, and the motor slows down. With a high enough frequency PWM signal the amount the motor speeds up and slows down in one period is negligible, and the motor turns at a constant speed. By adjusting the duty cycle the speed of the motor can be controlled.
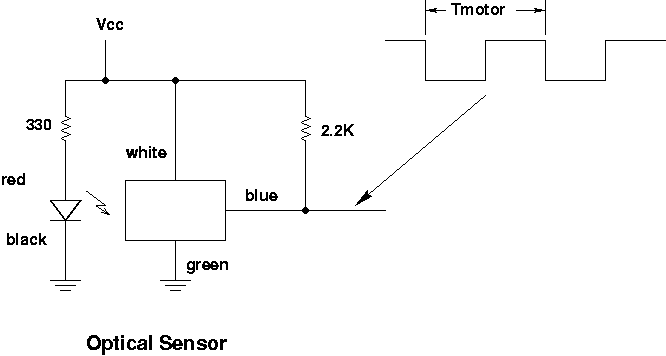
To make a motor turn at a desired speed it is necessary to know how fast the motor is turning. The motors you will use in this lab have encoders which will generate 320 pulses in a single revolution of the motor. The encoder works as shown in Figure 2. A light emitting diode (LED) sends light to an optical sensor. When the light shines on the sensor, the output of the optical sensor is VCC, a digital 1. When something blocks the light from reaching the sensor, the voltage goes to 0 V. a digital 0. As the motor turns, a transparent piece of plastic with black lines on it will pass through the sensor, and turn on and off the sensor. Thus, you will be able to measure the speed of the motor.
In this lab you will use the PWM subsystem of the HC12 to control the speed of a small motor, and use the input capture subsystem to measure the speed of the motor.
For the prelab do the calculations required for Parts 3 and 4. Write the program required for Parts 4, 5 and 6
Set the prescaler of the HC12 so the rollover time of the TCNT register is the smallest time which is larger than the above two numbers. What value did you use for the prescaler?
| PB3:0 | Duty Cycle | PB3:0 | Duty Cycle |
| 0000 | 6.25 % | 1000 | 56.25% |
| 0001 | 12.50% | 1001 | 62.50% |
| 0010 | 18.75% | 1010 | 68.75% |
| 0011 | 25.00% | 1011 | 75.00% |
| 0100 | 31.25% | 1100 | 81.25% |
| 0101 | 37.50% | 1101 | 87.50% |
| 0110 | 43.75% | 1110 | 93.75% |
| 0111 | 50.00% | 1111 | 100.00% |
Note that you should pre-calculate the duty cycles as the integer you will write to the duty cycle register which will give duty cycles closest to the values in the table. Do not use floating point arithmetic in your C program.