EE 308 -- LAB 10
Parallel Communications using the MC6821 PIA

In this lab, one HC11 board (the master) will be used to send instructions to another HC11 board (the slave). The master HC11 will send a byte to the slave HC11. The slave HC11 will display a pattern of LEDs depending on the value it receives. The system should use pulse mode handshaking.

The lower two bits of the input word will tell which pattern to implement, and the next two bits will tell the rate at which the display should update:

Switch Display
Switch Update
1:0 Mode
3:2 Rate
0:0 Increment 0:0 4 ms
0:1 Decrement 0:1 8 ms
1:0 Flash 1:0 16 ms
1:1 T-Bird 1:1 33 ms

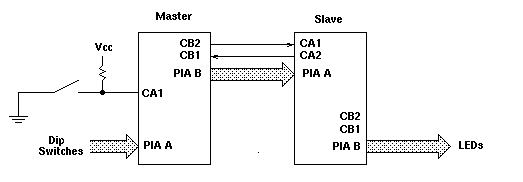
  1. Connect two HC11 EVBU boards together as shown below. The switch going to the CA1 line on the Master HC11 should be one of the debounced switches on your protoboard.

      
    Figure 1: Connection of two HC11 EVBU boards for parallel communication.

  2. Program the master HC11 board as follows:

    When the switch is pressed, the falling edge should generate a interrupt. In the interrupt service routine, the master will read the dip switches connected to its PIA Port A, send that number to the slave over its PIA Port B, and wait for the the acknowledgment that the slave has read the data. It will then return from the interrupt service routine.

  3. Program the slave HC11 board as follows:

    An interrupt will be generated when the slave receives data on its PIA Port A. In the interrupt service routine, the slave should read the value from PIA Port A, change a global variable which will control the display mode, and change the RTI interrupt rate.

  4. Verify that the system works properly.

  5. Connect your logic analyzer to the master's PIA Port B, CB1, CB2, CA1, IRQ and E Clock lines, and to the slave's IRQ and E Clock lines. Trigger your logic analyzer of the falling edge of the master's CA1 line. Measure the following times, and compare (where appropriate) to the values specified on the MC6821 data sheet:

    1. The time from the falling edge on CA1 to new data on the master's PIA Port B. This is how long it takes the master to get into the IRQ interrupt service routine, read PIA Port A, and send the data to PIA Port B.

    2. The time from the master's E clock going low to new data on the master's PIA Port B. This is time tPDW on the MC6821 data sheet.

    3. The time from new data on the master's PIA Port B to CB2 going low. This is time tDC on the MC6821 data sheet.

    4. The time from the master's E Clock going high to CB2 going low. This is time tCB2 on the MC6821 data sheet.

    5. The time from the master's E Clock going high to CB2 going high. This is time tRS1 on the MC6821 data sheet.

    6. The time CB2 is low. This is time PWCT on the MC6821 data sheet.

    7. The time from the slave's CA1 going low to the slave's IRQ going low. This is time tRS3 on the MC6821 data sheet.

    8. The time from the slave's E clock going high to the slave's IRQ going high. This is time tIR on the MC6821 data sheet.

  6. Re-program your HC11s to do handshaking in the interlocked mode. (You will need to modify one line of each program to do this.) Start your systems running again, and look at the logic analyzer output. Observe (and note) the difference between the pulse mode and interlock mode of handshaking.


Bill Rison, <rison@ee.nmt.edu >
Tue Mar 26 1998

© 1998, New Mexico Tech