EE321 Lab #13
Bipolar Junction Transistors, Part IV
AM Radio Receiver
This will be a team lab (it is too long to do by your self in a single lab) in which we will construct and test three modules, then connect them together to make a radio receiver that will pick up an AM station. The three modules are a radio frequency (rf) amplifier, an amplitude modulation detector and a power amplifier. One team member should build and test the Push-pull amplifier and AM detector. At the same time the other team member should build and test the rf amplifier. Both team members should work together to make measurements showing that each module works correctly.
Since this lab will be complex be very neat. Building the rf amplifier on a separate breadboard will reduce feedback through ground lines.
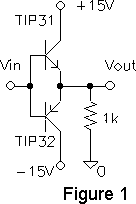
A. Push-Pull Amplifier.
1) The emitter follower circuits of lab 10 can supply bipolar currents to a load, but the negative load current is restricted in magnitude to the value of the bias emitter current. For large output currents, this means that the power dissipated in the transistor is large when no signal is present. The transistor dissipation is reduced by using the `push-pull' configuration shown in Figure 1. Construct the push-pull circuit and sketch its response to a 1 kHz sine wave. Do this on the right side of your proto board to allow room for more circuitry later. Sketch the output waveform. What causes the `cross-over' distortion?
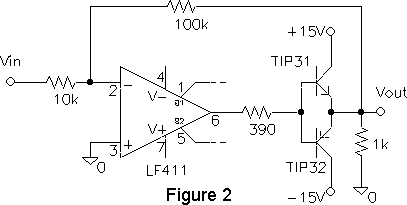
2) The above circuit can be used to boost the current output of an op amp as shown. The cross-over distortion is reduced by including it inside the feedback loop of the op amp. Build the circuit (Fifure 2) and observe vout for a sine wave input. What has happened to the cross-over distortion, and why? (Hint: look at the output of the op amp itself.)
WARNING If there is any error in this circuit the output transistors can over heat. Check to be sure they don't get hot. Ground the input and make sure that the output is almost 0 V
3) Reduce the output amplitude to 1 volt rms at the frequency three octaves above middle `C' (f = 440). Make certain there is no dc offset on the output before connecting it to the speaker. Connect the 8 Ohm speaker to the output. (Before doing this, compute the power that will be applied to the speaker. Will this produce a loud, medium, or soft tone?) Try sine, square and triangular wave inputs. Why do they sound different?
4) Measure the audible frequency response of this `hi-fi' system. What is the frequency response limited by?
B. AM Detector
5) The detector is basically a peak detector and high pass filter. Build the circuit shown in Figure 3. Set the input to a 1 MHz, 4 V p-p sine wave with a 1 V offset. Observe the signal at point B. Change the input amplitude by a volt and measure the change at point B. Try other amplitudes, frequencies and offsets, and determine what the circuit is doing.
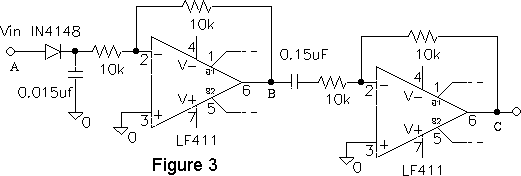
6) Reduce the input frequency to 1 kHz 1 V p-p sine wave with a 2 V offset. The output at C should be a sine. Why? Low frequencies should be blocked by the 0.15 uF capacitor. Find this cutoff frequency, fc.
C. RF Amplifier
The amplifier in Figure 4 uses a `cascode' configuration (Q1,Q2) to reduce the effect of the (Miller) capacitance across the base-collector junction of Q2. This improves the high frequency performance of the amplifier circuit. An emitter follower Q3 provides the circuit with a low output impedance. Use 2N2222 transistors for this circuit, which have better high frequency capability than 2N3904's.
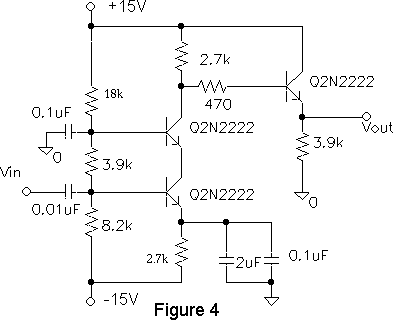
7) Construct the circuit neatly on your proto board. Measure the d.c. bias voltages to make sure that all transistors are in their active state. Checking bias voltages is a very useful way to detect bad wiring or bad components.
8) Input a small signal and measure the gain at 1 MHz. Measure the frequency response (find the 3 dB frequencies).
D. A Simple AM Radio
9) Test the operation of the circuit by using your body as an antenna. You should have about 1 volt p-p output signal, whose amplitude appears to be `noisy'. Measure the frequency (near 1 MHz). Sketch the shape of the amplitude-modulated waveform (between 100 and 1kHz). (Note: You must use your scope in analog mode to do this.)
10) Connect the RF amplifier to the detector. Look at the detected signal on your scope. Make sure there is no dc offset. Connect this to the power amplifier and to the speaker. Listen to what the mysterious waveform sounds like.