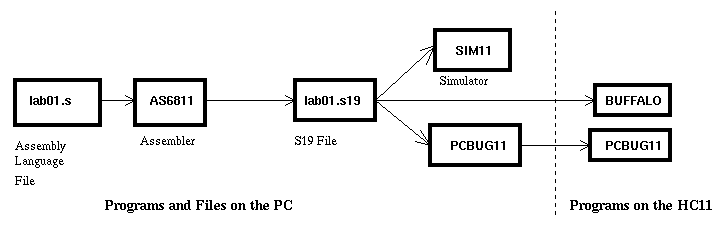
Figure 1: The relationship between AS6811 , SIM11 , BUFFALO, and PCBUG11.
EE 308 -- LAB 1
ASSEMBLER, SIMULATOR, AND MONITOR
Introduction and Objectives
This laboratory introduces you to the following 68HC11 assembly language programming tools:
The AS6811 assembler takes assembly language code in a form that a human can reasonably read with a little practice, translates it to machine codes, and stores them in a .s19 file which the 68HC11 microcontroller can understand. We have three assemblers available, ASM6811, IASM11 and AS11. The assemblers take slightly different forms of assembly language files. We will use the AS6811 assembler in this course; we can give you a copy of this assembler and its documentation for your personal computer.
The op-codes contained in the S19 records can either be run on the SIM11 simulator, or loaded into and run on the 68HC11. The BUFFALO monitor, running from HC11 EPROM, loads S19 records into the HC11 and provides some tools for debugging loaded programs. PCBUG11 performs the same functions as BUFFALO, but it runs partly on the PC and partly from HC11 RAM. PCBUG11 can be used to program HC11 chips that do not have BUFFALO in EPROM. BUFFALO, SIM11, and PCBUG11 all have very similar commands. We will not study PCBUG11 in this lab.
The relationship between these various programs is illustrated in Figure 1.
Figure 1: The relationship between AS6811 ,
SIM11 , BUFFALO, and PCBUG11.
Pre-Lab
You should read this entire lab before coming to lab, and answer all of the questions in the pre-lab section before coming to lab.
The BUFFALO commands of interest for this lab are: BF, BR, G, HELP, LOAD, MD, MM, P, RM, and T. Read the descriptions of these commands in Chapter 4 of the M68HC11EVBU Universal Evaluation Board User's Manual.
Question to answer before lab: Do you need the T option to the LOAD command when using the EVBU?
The assembly language commands of interest are: CLR, INC, INX, ASR, STA, LDA and LDX. Read the descriptions of these commands in the M68HC11 Reference Manual.
Question to answer before lab: What are the contents of the A register after each instruction of the program shown in Figure 2 executes?
; 68HC11 demo program
; Bill Rison
; 1/2/96

; This is a program to take a table of data, and create a new table
; which is the original table divided by 2

         .title  LAB 1 Demo Program

evbram   =  0x0000        ;0x0000 is start of user ram on 68HC11EVBU
data     =  evbram
prog     =  evbram+0x100  ;start program above BUFFALO
count    =  2             ;number of entries in table

         .area   CODE  (ABS)

         .org    prog     ;set program counter to 0x0100
         ldab    #count   ;ACC B holds number of entries left to process
         ldx     #table1  ;Reg X points to entry to process
repeat:  ldaa    0,x      ;Get table1 entry into ACC A
         asra             ;Divide by 2
         staa    count,x  ;Save in table2
         inx              ;REG X points to next entry in table1
         decb             ;Decrement number left to process
         bne     repeat   ;If not done, process next table1 entry
         swi              ;Done -- Exit


         .area   DATA  (ABS)

         .org    data
table1:  .db     0x07     ;initialize table1 (count bytes long)
         .db     0xae
table2:  .ds     count    ;reserve count bytes for table2.
We will use BUFFALO to explore the memory of the HC11 on your EVBU. Memory maps are shown on pages 4-4 and 4-5 of the M68HC11 E Series Technical Data Manual.
Question to answer before lab: Which of these maps applies to the HC11 on your EVBU?
If you have a PC at home, type the program shown in Figure 2 before coming to lab and save it under the name lab01.s.
You can assemble it at home, using the AS6811 assembler with the commands
> as6811 -l lab01.s
> aslink -o lab01.s19 lab01.o
The as6811 command will create a file called lab01.o which contains the machine codes in a special form which other programs can read. The -l option to the as6811 command tells the assembler to create a listing file lab01.lst which shows the machine codes in a form humans can read. The aslink command will translate the lab01.o file into a form which microcontrollers can understand. The -o lab01.s19 option to aslink tells the linker to create a .s19 file. (The linker can also generate a .ihx file, which is the form used by Intel microprocessors. We will not use the Intel file format in this course.)
Bring a disk with the program on it to the lab.
A thought from Uncle-Dad: As you gain experience you will operate independently in the lab. However, for the first few labs you should be pestering the lab assistants to distraction to make sure you get everything that you can from the time in the lab. We are there to help. Your part is to take the pre-lab seriously and show up for the lab session prepared.
The Lab
Type in the lab01.s program, and assemble it with the commands
> as6811 -l lab01.s
> aslink -o lab01.s19 lab01.o
Some questions on the output of the assembler:
Invoke the simulator by double clicking on the SIM11 icon in Windows. (You can also bring up the simulator from DOS by typing SIM11.)
Once you are in the simulator, load the .s19 file using
> load lab01.s19
Note that the program counter is not initialized. Type
> PC=0100
to initialize it. We are concerned with the DEBUG, CPU, CODE, and MEMORY windows. Observe that your program has appeared in the CODE window, and that the registers are in the CPU window. Trace, or single step, through your program using the T command and observe what is going on in the CODE and CPU windows.
When you are done single stepping, reset the program counter to 0x0100 and execute the entire program using the G command. Check that you have the expected result in the A register after the program execution.
Some questions on the simulator:
When you have finished exploring the simulator, type QUIT or EXIT.
To communicate with your HC11, first connect power and your PC's serial cable to your EVBU. Then double click on the Terminal icon in the Accessories program group of the Windows Program Manager . Select the Settings menu, Communications submenu, and set the communications parameters to COM2, 9600 baud, 8 data bits, 1 stop bit, no parity and no flow control. Power up your EVBU and hit the reset button. You should see a line of text about BUFFALO, or you might see a help screen go by.
To download your program to your EVBU type LOAD T at the BUFFALO prompt. Then select the Transfers menu, Send Text File submenu, and select the file lab01.s19 to send. Wait for the HC11 to respond with done. You might have to push the Reset button to proceed.
Using your EVBU do the same things that you did on the simulator, and answer all of the questions from the simulator section that are applicable to the EVBU. In addition:
Answer the following questions about the EVBU: